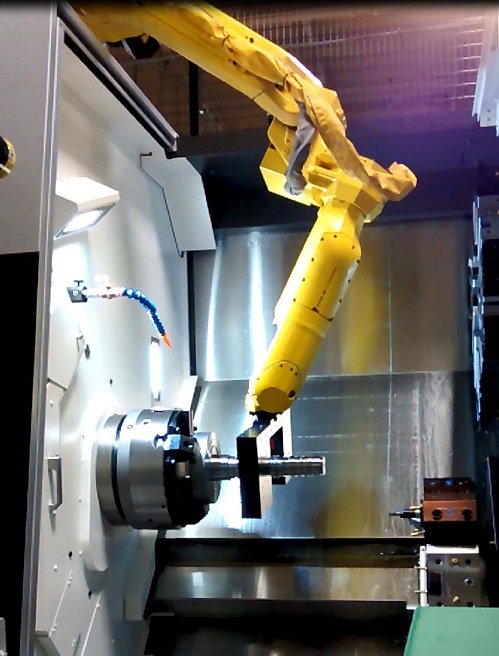
In Process Inspection – Fanuc robot reaches inside Okuma Lathe
In-process inspections enable manufacturers to reduce waste and produce higher quality parts over time. So why aren’t all manufacturers implementing in-process inspections?
Several reasons for sure. One primary reason is complexity. Implementing an in-process inspection meeting all project requirements is very challenging.
When off-the-shelf measurement gauges fall short, in-process gauging solutions are often beyond the expertise of application engineers and CNC distributors whether the problem is cycle time, multiple part profiles, multiple CNC machines used in production, or any number of other complications.
What then?
Often, they call an in-process metrology specialist to custom develop a part inspection solution using a combination of off-the-shelf and in-house manufactured measurement gauges capable of overcoming the obstacles for real-time part inspection.
Autonetics often receives this type of request from a variety of companies including John Deere, Caterpillar, Okuma, Hartwig, Morris South and others in the manufacturing industry needing in-process inspection support.
In Process Inspection – Fanuc robot on top of an Okuma latheAutonetics recently received a request for assistance from Hartwig and John Deere for an automated in-process robotic gauging inspection inside a lathe. The project involved using a Fanuc robot to reach inside an Okuma LU45’s moon roof for an automated inspection. Short cycle times were critically important so a non-contact measurement gauge was used. During the Okuma lathe’s machining operation, coolant and chips are removed with an air blast by the lathe in preparation for the part inspection. The retracting moon roof allows the Fanuc robot arm to enter the machining work area and position the custom-developed sensor at the work piece. Once the target part is confirmed, the sensor head requires only 10 to 15 seconds for a complete part inspection. After dialing in the system, a max uncertainty of .8um across 12 diameters was achieved.
With data collection complete, Autonetics metrology software immediately delivers results directly to the lathe. The measurement results can be output in real-time via an HMI located on the plant floor, a local database, an OPC server, a web service or any combination thereof. The software also features a user-friendly HMI that allows for modification of gauging parameters (callout tolerances), by the operator, on the fly.

Seems simple, right? It is, for the client. Autonetics takes the guesswork and worry out of an in-process and or post-process part inspection implementation. Complex one-off projects are routine, a specialty. So when your team is struggling to implement a part inspection solution, call us and allow the team of experts at Autonetics to solve your problem.
Based in Cary, NC, Autonetics custom develops non-contact measurement gauge solutions designed to operate in the most uncompromising of machining environments. Every gauge is armored for protection against accidental collisions and mishaps. Micron-filtered and dried air purge systems are featured on many of Autonetics applications to prevent particulate buildup on the sensor array optics. Every component that makes up the gauging hardware is vetted in industrial applications and has a proven track record. All of these features allow Autonetics customized measurement gauges to be safely installed at any step of the manufacturing process, are extremely reliable and require little-to-no maintenance.


