Driven by customer request, Autonetics persists in development and adaptation of our popular internal diameter gaging methods to challenging purposes.
We recognize that a variety of industries continue to develop devices that require precisely machined components. This trend is driving machine tool manufacturers to create compact machines tailored to shape such parts. A small bore size means there is limited space for supplementary equipment such as gages for in-process inspection. In-process robotic gaging systems not only permit automatic control and optimization of fabrication, but also can greatly increase efficiency by eliminating off-line measurement of critical dimensions.
At Autonetics, we offer two separate displacement measurement end-effectors to address bore gaging with sub-micron accuracy for bores 12mm and up.
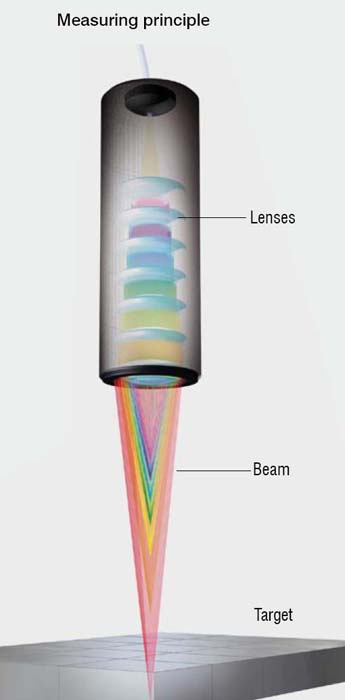
The confocal system
Using proven technology, polychromatic white light is focused onto the target surface by a multi-lens optical system. The lenses are arranged so that the white light is dispersed into a monochromatic light by controlled chromatic aberration. A specific distance to the target is assigned to each wavelength by calibration. Only the wavelength which is exactly focused on the target is used for the measurement. This light reflected from the target surface is passed through a con-focal aperture onto a spectrometer which detects and processes the spectral changes. With its compactness con-focal sensors can be paired to measure one to three bore sizes in one end effector.
Standard Model (seen right):
- Measuring range: 2.5mm
- Spot diameter: 20μm
- Linearity: 2μm
- Resolution: 0.1μm
- Measuring rate: 100Hz … 2000Hz
Non-contact capacitive system
Active tri-electrode sensors generate a linear output signal dependent on the distance between sensor surface and target surface. With the known distance between the sensors, the diameter of the bore can be determined easily. Long term repeatability is achieved with either solid non-conductive slide guides or non-conductive roller guides. This system can then be used as a single bore size gage with motorized linear rail systems or several bore sizes using articulated robotics with multiple gage attachments.
- Measuring range: 0.05 to 10mm
- Linearity: Less than or equal to .05%
- Resolution: 0.000075%
- Bandwidth: 8.5 kHz (-3dB)
The problem of target grounding in older systems can be very difficult to overcome. Unlike conventional systems the target does not require any electrical grounding because of the unique synchronized-non-contact-grounding technology. At the same time any interference caused by electrostatic charge of the target is eliminated.
ID bore gaging has now passed the design stage and will be in production in the near future. Please visit often for updates and reviews. Autonetics continues in our promise to bring clients the most recent breakthroughs from our laboratories and our strategic partners. As with all our products, real world testing and practical applications are the foundation on which we build improvement.


